Using Geek Power for Good: Better Living Through Code Edition

bottle of Buffalo Trace bourbon

Buffalo Trace bourbon

Bourbon has become a hot commodity, and as it takes years to make, the supply can’t quickly ramp up to match demand. Buffalo Trace is one of many brands that have become quite popular, making it hard to find. The clerk at a local Virginia ABC store told my wife that they get a small shipment in and it “flows out like a river”, and is gone in a day. My wife found that you could check inventory of local stores online, and asked me to write a script to check it. Starting tomorrow morning, the “Buffalo Hunter” script will run once a day, check the inventory at our two closest stores, and send her a text if there are any bottles in stock.

Version 1 was a fun 1-day project. I had to learn some new tricks, as the page uses client-side javascript and I hadn’t used Twilio to send texts before, but I got it all working well. Some time later I decided to port it to the cloud, using the AWS Lamda service, which had a short but steep learning curve.

The website uses javascript to generate a dynamic page, so I couldn’t simply use something like Beautiful Soup to parse the html. So I used Selenium, using a Chrome headless browser on my local version, switching over to phantomjs on AWS. I switched to phantomjs because you need to have executables compiled to run under AWS, and I found a precompiled version of phantomjs on the web, and didn’t find the same for Chrome.

There was one other “gotcha” I ran into. I use Windows. While I had found a correctly compiled phantomjs executable, when I zipped it along with the other files to upload, it lost its permissions settings. I could have booted up in Linux, instead I installed the Linux subsystem that’s available for Windows 10 and used bash to zip the files up. That ended up working fine. You also need to change the directory for the phantomjs log to the /tmp/ folder that AWS gives you write access to.

In version 1, I handed off the final processed web page to Beautiful Soup because I hadn’t used Selenium’s parsing before, and I’d used Beautiful Soup’s. You can easily hand off the processed resulting web page from Selenium to Beautiful Soup (see the commented out line that starts page2Soup in the code below). When I moved to Amazon, I also figured out how to do the page scraping in Selenium, so that I didn’t need Beautiful Soup any more. The concept’s simple, but I didn’t find a good reference for the find_element)by_css_selector in python, so it took a little trial and error. .If you’re interested, here’s the version of the code that runs on AWS:

Buffalo Hunter.py


import logging
import datetime
import time
# from bs4 import BeautifulSoup
from selenium import webdriver
from twilio.rest import Client

accountSID='SID Here'
authToken = 'token here'
stores = {'219': 'Old Courthouse' , '231': 'Maple Ave.'}

# options = webdriver.ChromeOptions()
# options.add_argument('headless')
# driver = webdriver.Chrome('c:/program files (x86)/chromedriver.exe')
driver = webdriver.PhantomJS(executable_path="/var/task/phantomjs", service_log_path='/tmp/ghostdriver.log')

def myhandler(event, context):
	try:
		results = ''
		success = 0
		for store in stores:
			driver.get('https://www.abc.virginia.gov/stores/'+store)
			make_my_store = driver.find_element_by_id('make-this-my-store')
			make_my_store.click()
			time.sleep(5)
			driver.get('https://www.abc.virginia.gov/products/bourbon/buffalo-trace-bourbon#/product?productSize=0')
			time.sleep(5)
			element = driver.find_element_by_css_selector('td[data-title="Inventory"]')
			# page2Soup = BeautifulSoup(driver.page_source, 'lxml')
			# element = page2Soup.find("td", {"data-title": "Inventory"})
			inventory_value = element.text
			if inventory_value <> '0': success = 1
			results= results+stores[store] +' has '+inventory_value+ ' bottles of Buffalo Trace. '
		driver.close()
		driver.quit()
	# Send results if inventory not 0 at both stores
		if success == 1:
			results = 'Success! ' + results
			twilioCli = Client(accountSID, authToken)
			myTwilioNumber = 'myPhoneNumberHere'
			destinationCellNumber = 'destinationCellNumberHere'
			message = twilioCli.messages.create(body=results,from_=myTwilioNumber, to=destinationCellNumber)
	except Exception as e:
		logging.error(str(datetime.datetime.now())+' Error at %s', 'division', exc_info=e)

Yorick 2.0: The Personality Split

Introduction

When Yorick was first brought to life, he had Alexa’s voice. A lot of his charm was the incongruity between his appearance and his voice. At the same time, a number of folks asked about having a creepier voice and I wanted to try to do that for this Halloween.  An update to the AlexaPi project added support for the SoX audio playback handler as an alternative to VLC. SoX has support for audio effects, so it became possible to change Yorick’s output voice. I didn’t want to lose Alexa’s voice, so I edited the AlexaPi code so that it would recognize both “Alexa” and “Yorick” as trigger words, with the output sound depending on which trigger word you used. As a result, Yorick now responds either as Alexa or with his own voice.

Just like Elliot on Mr. Robot, Yorick now has a split personality.

Conversations

I talked to Yorick, aka Alexa, a bit about Halloween:

It turns out that Yorick is a baseball fan and was rather disappointed that the Washington Nationals aren’t in the World Series. Awhile back, I asked him about going to one of the playoff games:

Technical Notes

AlexaPi uses PocketSphinx for recognizing the trigger word. The original code is set up to recognize a single trigger word or phrase, which you can easilly change in a yaml configuration file. However PocketSphinx can recognize multiple keywords or phrases selected from a python list. Some editing of the AlexaPi source code was needed in order to change the trigger from a single variable to a list. Similarly, the code was modified slightly so that once a trigger word was recognized it checks which word was used. If the trigger word is “Yorick” it changes the pitch and speed of the audio output.

I used version 1.5 of AlexaPi. This and previous versions had a problem in that the temporary file names used were the response code that the Alexa voice service returned. These sometimes included characters that were illegal for file names or that were too long for a file name. I patched these problems (and later versions of AlexaPi have fixed this problem).

In addition, the servo motion routines had to be modified slightly, as version 1.5 and later of AlexaPi begins streaming questions to the Alexa voice service as they are asked, rather than waiting until the question is finished. This results in a faster response time.

Lidar Part 3: Improvised 3D Scanning with Neato XV-11 Lidar

Lidar setup and 3D scan

It’s been over two years since I first wrote about lidar units, and at the time I stated I wrote that the final part would be a look at the Neato XV-11 that I had purchased off of Ebay. That got delayed by several years, first due to an initially bad unit (but great response from the seller to correct the problem!), then higher priority projects and life intervened, but I’m finally ready to report. Besides playing around with the unit, I added some enhancements to the display software available from Surreal, who make the controller unit I used, and mounted the lidar on an pan-tilt system so I could do 3D scans.

Equipment:

Construction

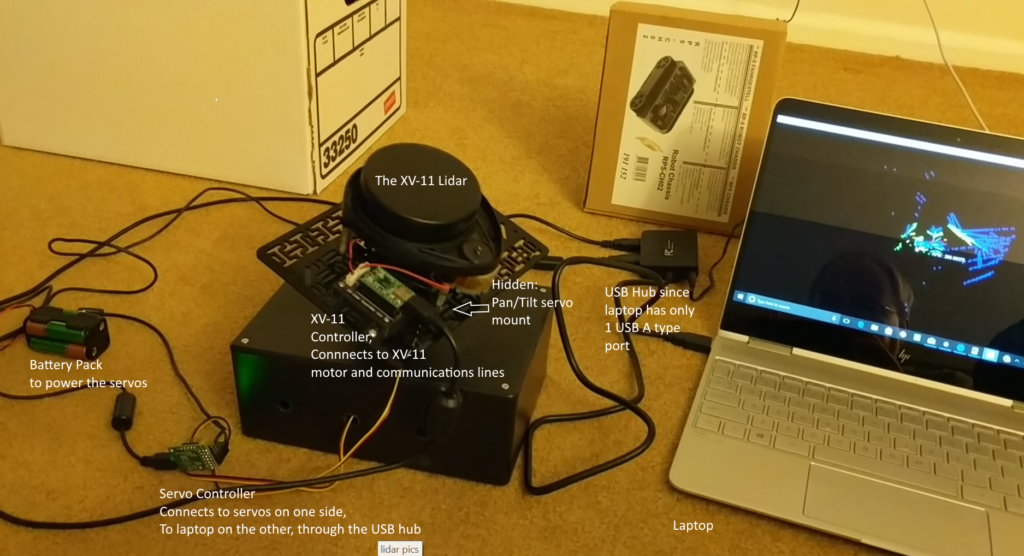
Construction is really straight-forward. I mounted the lidar to a plastic base plate using some standoffs (since the drive motor sticks out underneath the unit). Then I mounted the base plate to the pan-tilt system, and mounted that to a project box I had lying around.

XV-11 lidar mounted on a servo-controlled pan/tilt system for 3D scans

The XV Lidar Controller version I used is built around a Teensy 2.0 and uses PID to monitor and control the rotation speed of the Lidar, controlling it with PWM. In addition, it reads the data coming off the lidar unit and makes the information available through a USB port.

The servos are both connected to the servo controller, which also uses an USB interface. The figure below shows the setup:

Labeled picture of the setup

Software

I didn’t touch the firmware for the lidar controller. The source code is available through links at Surreal’s site. There are several very similar versions of visualization code in python that takes the output from the lidar controller and displays it using VPython. They all seem to start from code from Nicolas Saugnier (Xevel). I started with one of those variants. The main changes I made were 1) to add the ability to do a 3D scan by sweeping a pan/tilt mount through various pre-set pan and tilt angles and 2) to add the ability to capture and store the point cloud data for future use. In addition, I wrote a routine to then open and display the captured data using a similar interface. Additional smaller changes were made such as implementing several additional user controls and moving from the thread to the threading module.

The pan-tilt setup does not rotate the lidar around the centerpoint of itself. Therefore, in order to calculate the coordinate transformation from the lidar frame of reference to the original non-moving frame you have to do both a coordinate rotation and an angle-dependent translation of the origin. This is handled by the rotation.py routine using a rotation matrix and offset adjustments.

The servos are controlled through a servo controller, with the controlling software (altMaestro.py) being an enhanced version of the python control software available through Pololu that was originally developed by Juhapekka Piiroinen and Brian Wu. My version corrects some comments which were inconsistent with actual implementation, fixed bugs in the set_speed routine, and added “is_moving” as a API interface to be able to check whether or not each individual servo was moving.

The point cloud data is stored in a simple csv file with column headings. Each row has the x, y, and z coordinates, as well as the intensity value for the returned data point (provided by the XV-11), and a flag that is set to 1 if the XV-11 has declared that the intensity is lower than would normally be expected given the range.

When displaying the results, either during a scan or from a file, the user can select to color code the display by intensity, by height of the point (the z value), or by neither. In the latter case, points with the warning flag set are shown in red. In addition, as in the original software, the user can toggle showing lines from the lidar out to each data point and also an outer line connecting the points.

The software, along with some sample point cloud files, can be found on my Neato-XV-Lidar-Tools repository on GitHub.

A Note on VPython Versions

The original visualization code was written for Python 2.x and for VPython 2.6 or earlier. After some deliberation, I decided not to update this. Post version 6, VPython internals have been entirely redone, with some minor changes to how things are coded. However VPython 7 currently has issues with Spyder, that I use as my development environment, while VPython 6 won’t run in Python 3.x, and never will. It shouldn’t be a hard lift to convert the code, but note that if you update it to run under Python 3 you’ll also need to update to VPython 7 or later, while updating VPython alone may create issues depending upon your development environment. So it’s best to make both updates at the same time.

Sample Results

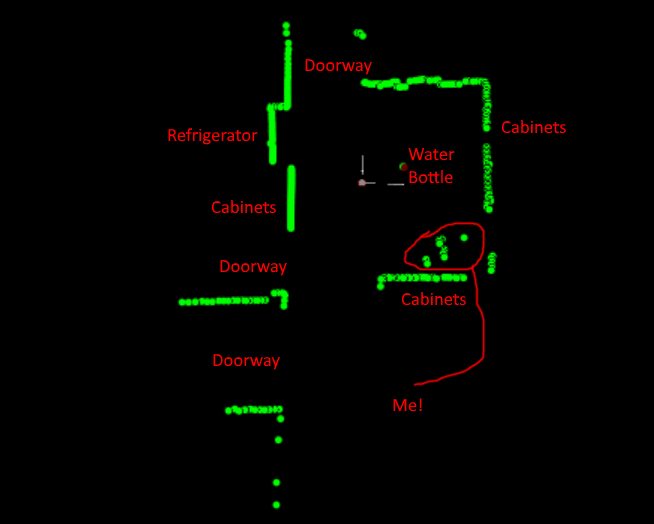
This first scan is a 2D scan from the floor of my kitchen, with annotation added. It clearly shows the walls and cabinets, as well as the doorways. Note that the 2nd doorway from the bottom is to a stairway to the basement. Clearly either a 3D scan or an additional sensor would be needed to keep a robot using the lidar from falling down the stairs, which the lidar just sees as an opening at it’s level!

2D Lidar scan of my kitchen

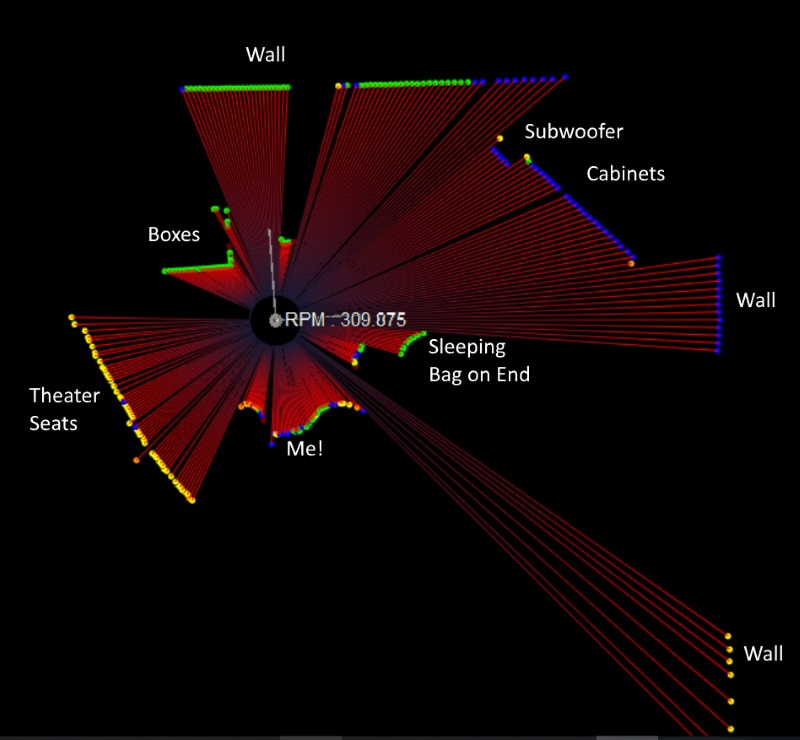
As mentioned above, one option is to display lines from the lidar unit out to the point data, This is shown in the annotated scan below:

2D Scan showing lines to each data point

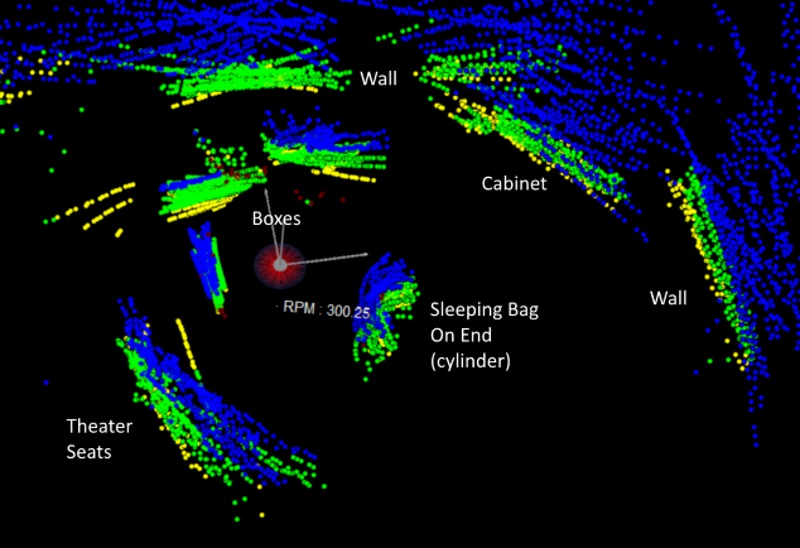
The display options also allow you to color code the data points based on either their intensity or their height off the ground. Examples of the same scene using these two options are shown below. In the intensity scan, you can see that nearby objects, as a general rule, show green (highest intensity), however the brown leather of my theater seats do not reflect well, and hence they appear in orange, even though they aren’t very far away from the lidar unit.

3D scan, with colors indicating height

3D scan with colors depicting intensity of the return

Even after calibrating the pan and tilt angles the alignment is not perfect. This is most clearly seen by rotating the view to give a top/down view and noting that the lines for vertical surfaces do not all overlap on the display. The 3D results weren’t as good as I’d hoped, but it certainly works as a proof of concept. The 2D results are very good, given the price of the unit, and I could envision modifying the code to, for example rapidly capture snapshots and use the code to train a machine learning program.

Potential Enhancements

One clear shortcoming in the current implementation is the need to carefully calibrate the servo command values and the angles. This takes some trial and error, and is not 100% repeatable. In addition, one has to take into account the fact that as the unit tilts, the central origin point of the lidar moves, and where it moves to is also a function of the pan angle. One of the effects of this setup is that unlike an expensive multi-laser scanning unit, each 360 degree scan is an arc from low to high to low, rather than covering a fixed elevation angle from horizontal. This makes the output harder to interpret visually. The 3D scanning kit from Sweep takes a different approach, rotating the lidar unit 90 degrees, so that it scans vertically rather than horizontally, and then uses a single stepper motor to rotate the unit through 360 degrees. Both the use of a single rotation axis and the use of a stepper motor rather than a servo likely increase the precision.

With either 2D or 3D scanning, the lidar can be used indoors as a sensor for mobile robots (as that’s what it was used for originally, after all). There’s an interesting blog post about using this lidar unit for Simultaneous Location And Mapping (SLAM). I may try mounting the lidar and a Raspberry Pi on a mobile robot and give that a try.