Lidar: Coming Soon at a Price You Can Afford (part 2)

Part 1 of this series discussed the sub-$500 XV-11 and RPLIDAR units that are available at the lowest end of the price range. This part of the series discusses lidar units in the $1,000 – $10,000 range. Part 3 will conclude the series with a hands on look at the NV-11, once I’ve received the one I’ve ordered and have had a chance to explore its use.

Deeper Pockets

$1,000 – $10,000 is out of reach for most individual hobbyists, but not unreasonable for a team project or not-particularly well-funded research team. In this price range, you get upper end low-range devices intended for indoor use, but you also move into devices with much longer ranges, intended for indoor or outdoor use, and the recently announced Velodyne Puck provides a new level of performance for a lidar costing less than $10,000.

Comparison Chart

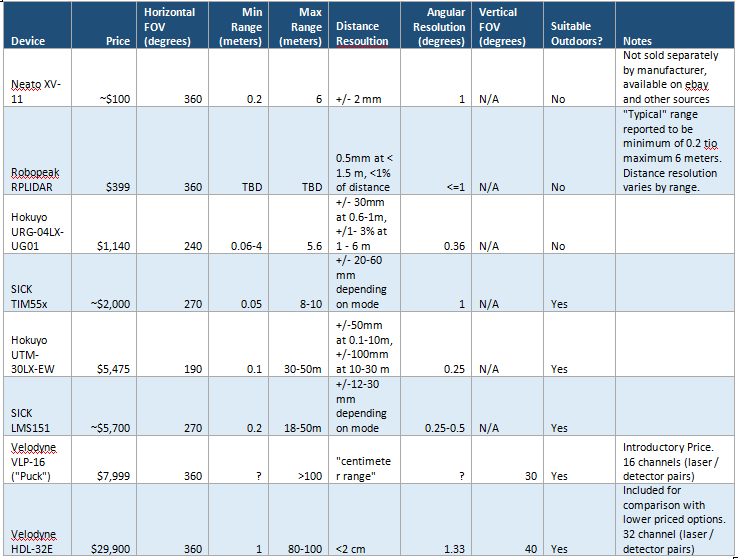
The chart below, drawn from multiple sources on the web, provides some of the key performance characteristics for $100 – $8,000 lidar units described in the article. Also included for comparison is a $29,900 unit. There are additional factors to consider when purchasing a lidar unit. The purpose of the chart is to give an idea of what performance is available at what price points.

Lidar Comparison Table

Lidar Comparison Table

What You’ll Get for Your Money

If you have less than $1,000, you can get a 2D scanning lidar unit for indoor use with limited range (up to about 6 meters). The lidar will use triangulation rather than time of flight to determine distance.  However, the performance appears to rival that of units costing over $1,100, so if you only need a short-range indoor unit, a Neato XV-11 or RPLIDAR is worth considering. the extra cost of the RPLIDAR gets software and support. The XV-11 is only available from resellers who get them from Neato robotic vacuum cleaners. While not supported by the manufacturer, the community had developed drivers, interfaces, and other software for this unit.

If you’re looking for something with a longer range and/or for outdoor use, you’re going to need to spend at least $2,000. In the $2,000 – $6,000 price range you’ll find units rated for outdoor use, with maximum ranges between 8 and 50 meters.  These will be 2D scanning units that use time of flight to measure distance. Some of these units can process multiple returns from each pulse, giving an indication, for example, of the height of vegetation if measured from above.

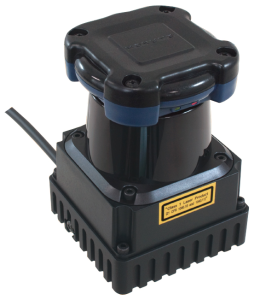
Mid-Priced Hokuyo UTM-30LX-EW lidar

Mid-Priced Hokuyo UTM-30LX-EW lidar

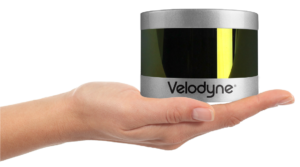
Up until very recently, if you wanted to take the next step up to a 3D scanning, long range, outdoor unit, you needed about $30,000.  However the newly announced Velodyne VLP-16, aka, Velodyne Puck will deliver this level of performance at under $8,000. It has 16 channels to scan a 30 degree vertical field of view with each rotation and covers a full 360 degrees.

Velodyne "Puck" 3D Scanning lidar

Velodyne “Puck” 3D Scanning lidar

While not as capable as the Velodyne HDL-32E, included in the above chart for comparison, it is the first multi-channel, 3D scanning, long-range lidar available for less than $10,000. While not as capable as the higher end unit, it also costs less than 1/3rd the price. It will be interesting to see if automated passenger car researchers can utilize this new, lower cost unit.

Still to Come

Part 3 will describe my experience with an XV-11 unit, once it arrives and I have a chance to play around with it.

Lidar: Coming Soon at a Price You Can Afford (part 1)

Google’s automated vehicles are instantly identifiable by the rotating lidar unit mounted on their roofs, and most other automated driving research vehicles are also using lidar, either in similar roof mounted systems (e.g., Bosch), or in multiple units, each with less than a 360 degree field of view (e.g., Carnegie Mellon). These are very powerful, 3D scanning sensors, but they don’t come cheap. According to reports, Google uses a sensor from Velodyne that costs approximately $75,000. Some of those with less than a 360 degree scan can be had at less than half that price, but you need several of them. I don’t think any hobbyists (unless they are in the 1%) are going to run out to get one to use in their robotics project. A good video showing the processed information derived from the Google car is viewable here: http://youtu.be/_EMAoiqLq9Y.

Until just a few years ago, that was about it. If you wanted to experiment with a lidar unit, you needed to shell out over $10,000. But that’s changed, and it’s starting to change even faster.

 Lidar on the Cheap

Lidar generally works by sending out a laser signal and measuring the time it takes to get a reflected signal back from an object. Like radar, you get a range and direction. this distinguishes lidar from laser rangefinders, which determine distance only (and at least one vendor,  apparently wanting to exploit the interest in lidar, advertises their rangefinder as a lidar unit). Lidars are not mass-produced, and sophisticated electronics that handle are precise at processing extremely tight time frames (the time of flight difference for a radar return from 1 meter versus 10 meters is EXTREMELY small). Very precise mechanical parts are typically required.

 The Neato XV-11

However, in 2010, Neato Robotics introduced a new robotic vacuum cleaner that got robotics hobbyists very excited. Not because they don’t like dirty floors, but because it incorporated a lidar unit as part of its navigation system. And the entire vacuum cleaner, lidar included, cost less than $400. Hobbyists got right to work hacking the lidar unit, and, while the manufacturer doesn’t sell just the lidar units, they are available on ebay and other sources for under $100 each! The interface has been reverse engineered and documented on many websites, including the XV11hacking wiki. Interface code for ROS and other platforms, e.g., arduino, have also been developed. At least one vendor, Get Surreal, sells a controller board for this unit to simplify use.

Part of the cost reduction comes from using a different approach for ranging. Rather than using time of flight for the lidar signal, the Neato unit uses  triangulation, with a laser diode emitter and an imager receiver. This eliminates the need for extremely time-precise electronics.  A technical paper on their lidar, A Low-Cost Laser Distance Sensor, is available on the web.

Obviously these units don’t compare with a $75,000 unit. Their range is on the order of 6 meters (nice for indoor or slow speed operation, but hardly something you can build an autonomous passenger vehicle around). The resolution is lower, and they produce a 2D scan, not a 3D scan. A nice, short, video demo of the type of performance you might expect is at http://youtu.be/WkW55b-WQx4. One could mount one on a tilt platform and produce a 3D point cloud from multiple scans at different angles of elevation, but it would be slower. This video shows that approach, albeit for a different lidar unit.

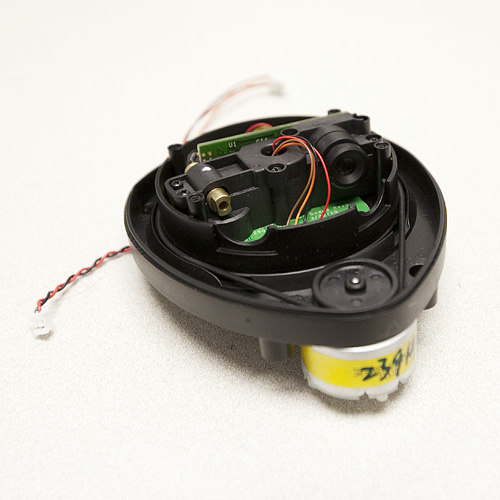
Neato Robotics XV-11 lidar with top removed

the XV-11 Unit, with the top removed. (photo source: Sparkfun)

I’ve got an XV-11 unit and controller board on order, and will report about it in part 3 of this series (which could be awhile in coming).

 RPLIDAR

The XV-11 was the first low-cost lidar unit for hobbyists, but new options at a variety of price ranges are coming available. Robopeak has introduced what appears to be a similar unit to the XV-11, the RP developed and designed for hobbyists and researchers.  Priced at $399, it includes, according to reviewers who have purchased the product, good sample drivers for several platforms, including ROS and arduinos, as well as a full SDK and good documentation (something that won’t be found when buying an XV-11 unit on ebay). For many, the greater ease of use and reduced time would be worth the price difference from an XV-11.

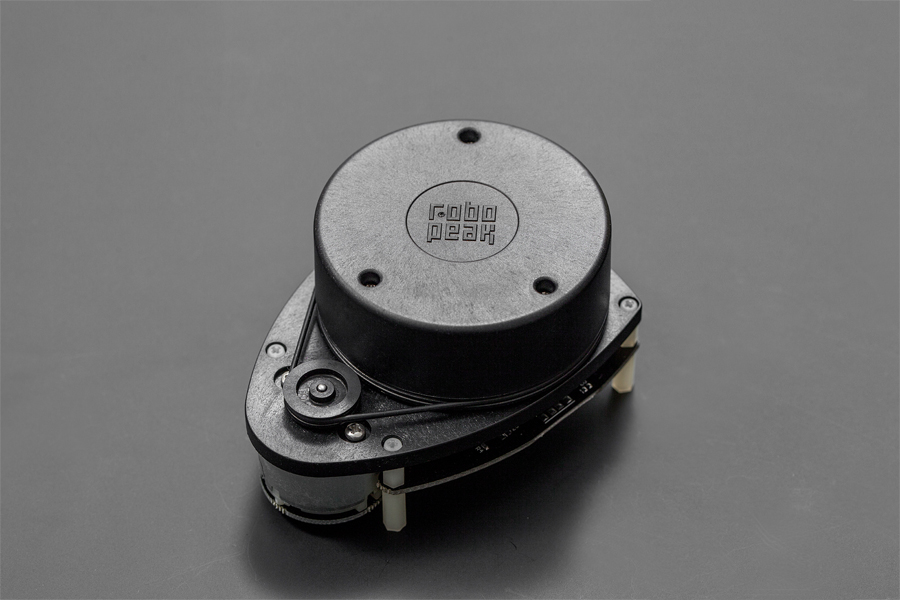
RPLIDAR Unit

RPLIDAR Unit (photo source: DFRobot)

ADDED: LIDAR-Lite

A number of low-priced laser range-finders advertise themselves as lidars, but with this exception, I’ve looked at only systems that scan, either in 2D or 3D as lidars. While a range-finder (1D), the LIDAR-Lite has some very interesting advertised capabilities at a low price point, which might make it worth exploring putting it on a rotating platform as a lidar unit. Rather than directly measuring time of flight, as more expensive units do, or using triangulation like the NX-2, it sends out a coded waveform and, if I understand what they are saying on their website, uses signal processing to look at the shift coming back as compared with an identical reference signal.

The unit is very small (21 X 48.3 X 35.5 mm) along with a similarly sized single PCB board and costs $89. Keep in mind this is for a range-finder. You’d still have to have a precision panning platform to use it as the core of a full lidar. What makes this unit interesting is that with the $89 laser version, with optics, they claim a maximum range of 30-60 meters, and that it works outdoors in sunlight, which is, as far as I can tell, unprecedented for such a low-cost unit. 

Deeper Pockets

Part 2 of this series will discuss some of what’s available for budgets of $1,000 – $10,000, including the recently announced Velodyne Puck.

Velodyne "Puck" 3D Scanning lidar

Velodyne “Puck” 3D Scanning lidar

Field Report: Riding in a Self-Driving Car

Last month, as part of my work, I got a chance to attend TRB’s 2nd Annual Workshop on Vehicle Automation, held at Stanford University. It had a lot of interesting presentations and discussions, and almost all of the material is available at the above website. As part of the workshop, they had several demonstration vehicles, including one of Google’s cars, which my colleague got a chance to ride in, and a very similar vehicle from Bosch, which I got a chance to ride in.

Bosch self-driving car

After the demo ride, safe and sound.

The Bosch vehicle is very similar to everything I’ve seen and heard about the more well-known Google vehicles. It has a number of both forward, rear, and side looking radars, as well as the LIDAR on the roof.  The LIDAR and very accurate GPS are very expensive sensors, and not expected to drop to what’s needed for production vehicles.  Bosch’s research plan is to transition to a more cost-effective sensor suite over the next several years. It was fascinating to watch the real-time display of what the LIDAR and radars were seeing as we drove. One thing I found interesting is that the vehicle was often able to “see” several cars ahead. Here’s a close up of the LIDAR system:

LIDAR sensor on roof of Boach automated vehicle

The LIDAR sensor

For the demo, the human driver drove the vehicle out onto the freeway and then engaged the automation features.  The vehicle then steered itself, staying within the lane, and kept it’s speed. When a slower vehicle pulled in front, the vehicle automatically checked the lane to the left and then switched to the left lane in order to maintain the desired set speed.  VERY impressive!

A couple of notes: at one point the vehicle oscillated very slightly within the lane, all the while staying well within the lane, sort of what a new driver might sometimes do. I thought it might be the tuning in the control algorithm and asked about it, but the researcher believed it was actually a slight wobble in the prescribed path on the electronic map, although he was going to have to look at the details after the conference to confirm this. Also, when a car pulled in front of us with a rather short separation distance, the vehicle braked harder than it probably needed to, which IS just a matter of getting the tuning right. Other than the hard braking, it felt very comfortable and normal.

This was actually my third demo ride in an automated vehicle. The first was in Demo ’97, as part of the Automated Highway System program. That was very impressive for it’s time, but the demo took place on a closed off roadway, rather than in full normal traffic on an open public freeway, like the Bosch demo.In addition, the vehicle control systems and sensors were far less robust, relying on permanent magnets in the roadway for navigation. Even then, there was work going on with vision systems, but the computing power wasn’t quite there yet. In 2000, I rode in a university research vehicle that used vision systems around a test track at the Intelligent Transport Systems World Congress in Turin, Italy. That system, while it used vision rather than magnets, was, while again a great step forward, far from robust. Today’s systems, if they can get the cost down, seem well on the path to commercial sale.

While Google executives have talked about vehicles with limited self-driving being sold before 2020, most other companies were talking about the mid 2020’s. This isn’t for a vehicle that can totally drive itself anywhere, which is the long-term dream, but rather for a vehicle that can often drive itself and can totally take over for long stretches of the roadway.  The National Highway Traffic and Safety Administration (NHTSA) has a very useful five-level taxonomy for levels of automation:NHTSA defines vehicle automation as having five levels:

  • No-Automation (Level 0): The driver is in complete and sole control of the primary vehicle controls – brake, steering, throttle, and motive power – at all times.
  • Function-specific Automation (Level 1): Automation at this level involves one or more specific control functions. Examples include electronic stability control or pre-charged brakes, where the vehicle automatically assists with braking to enable the driver to regain control of the vehicle or stop faster than possible by acting alone.
  • Combined Function Automation (Level 2): This level involves automation of at least two primary control functions designed to work in unison to relieve the driver of control of those functions. An example of combined functions enabling a Level 2 system is adaptive cruise control in combination with lane centering.
  • Limited Self-Driving Automation (Level 3): Vehicles at this level of automation enable the driver to cede full control of all safety-critical functions under certain traffic or environmental conditions and in those conditions to rely heavily on the vehicle to monitor for changes in those conditions requiring transition back to driver control. The driver is expected to be available for occasional control, but with sufficiently comfortable transition time. The Google car is an example of limited self-driving automation.
  • Full Self-Driving Automation (Level 4): The vehicle is designed to perform all safety-critical driving functions and monitor roadway conditions for an entire trip. Such a design anticipates that the driver will provide destination or navigation input, but is not expected to be available for control at any time during the trip. This includes both occupied and unoccupied vehicles.

Level 2 systems have already been announced as coming into production by several automakers within the next 5 years. Level 3 by the mid 2020’s is the stated goal of several companies. Full automation (the truly autonomous vehicle with no driver required) is still the stuff of science fiction, but where a lot of really interesting effects on society develop.

Here’s a short 3 minute Bosch video on their vehicle and their research: