Summary
This project uses a combination of screen-scraping and an API to obtain current travel speeds and the current variable toll costs for Interstate 66 inside the beltway in northern Virginia, and provides the information to users via Amazon’s Alexa voice service. To try it out, first enable it (either just say “Enable sixty six tolls” or visit Sixty Six Tolls in the Amazon skills store). From then on, just say “Open sixty six tolls.”
Resources
The project uses Alexa’s voice service. The code is written in Python 3, using the Alexa Skills Kit SDK for Python. The code runs on AWS’ lambda service. It also makes (minimal) use of DynamoDB to store user-specific information. Travel times are scraped from the Virginia DOT’s (VDOT’s) 511 Virginia Traffic Information website. The real-time toll prices are obtained via an API to VDOT’s SmarterRoads data portal. Web scraping and XML parsing was done using Python’s Beautiful Soup library.
The python code as well as the interaction model (a JSON file) are available at https://github.com/ViennaMike/I-66-Tolls
Background
I was looking for a project that would use one of the data sets on the SmarterRoads portal, and I decided that it would be useful to be able to check the dynamic tolls on Interstate 66 inside the Beltway in Northern Virginia. Inbound traffic is tolled between 5:30 and 9:30 am, while outbound traffic is tolled between 3:00 and 7:00 pm.
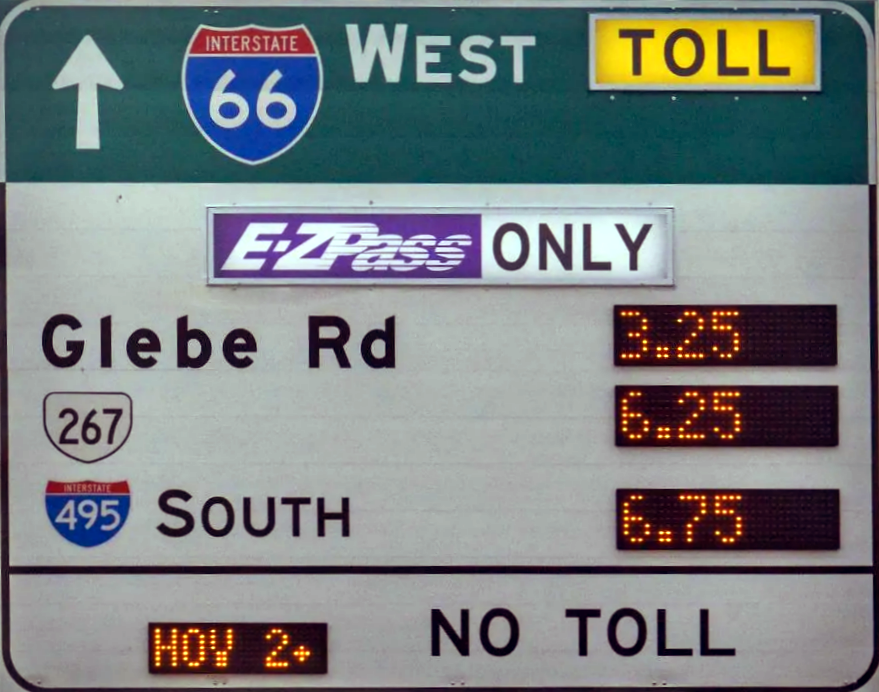
The tolls are dynamically adjusted to maintain high speeds. While the toll may change between checking the cost at home and the time a driver reaches their entrance, it’s still useful to have an idea of the highly variable toll, especially since tolls for the entire 10 mile length have sometimes spiked at over $40.
I had previously written a simple quiz skill using Amazon’s template, but this was my first custom skill.
Description
The overall architecture for the Alexa skill is shown below:
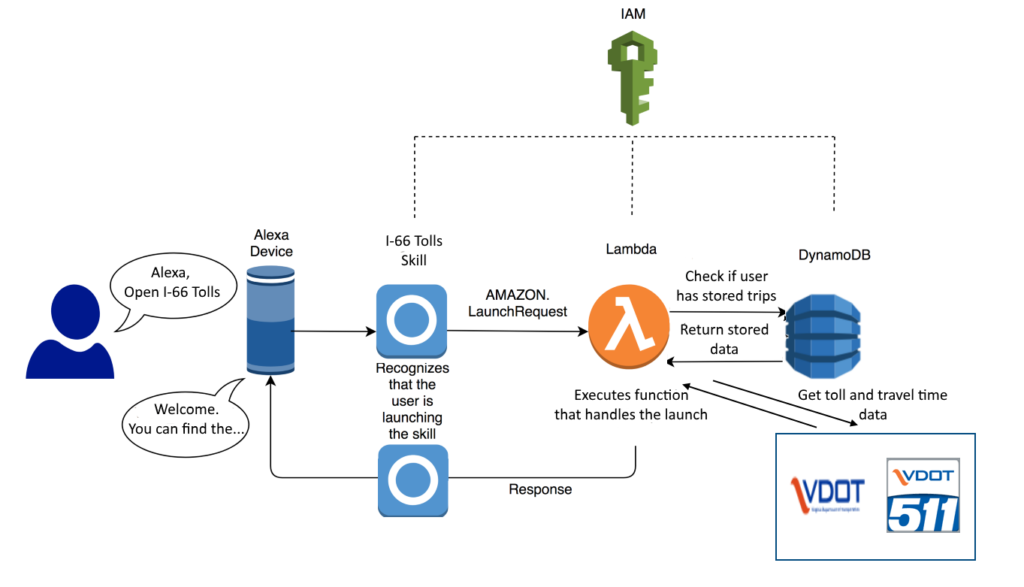
When a user interacts with the skill, the input is processed according to the interaction model that the developer defines in the Alexa Skill builder. This is captured in a JSON file. The skill builder is also where you tell the skill where to find the execution code for handling requests and ready a skill for certification and distribution.
In the case of 66 Tolls, there are eight custom intents, along with the Alexa built-in intents such as HelpIntent, FallbackIntent, StopIntent, etc. The custom intents are:
- get_speeds for getting speeds and travel times for the two roughly parallel travel options (I-66 and US-50)
- get_toll_hours to get static information on the hours that tolls are in effect
- get_details to get additional static information about how the dynamic tolling system works
- list_interchanges to get a list of inbound and outbound entrances and exits
- get_toll to get the current toll price for a specified direction from a given entrance to exit
- save_trip to save the user’s most frequent entrance and exit in each direction
- get_favs to report back to the user what trips he has previously saved.
- get_specific_help to provide help on particular types of requests (get toll, get speeds, and save trips).
When the skill is opened by a user who has previously saved a trip, the skill immediately returns the appropriate current inbound toll if it’s in the morning, or outbound toll if it’s in the evening or afternoon.
The Alexa Skills Kit SDK contains built-in functions to simplify interacting with Amazon’s DynamoDB NoSQL database. This skill uses a simple DynamoDB table to store the user_id (the key), most frequent inbound entrance and exit, and most frequent outbound entrance and exit.
By far the easiest part of the project was the code to get the travel times and tolls from the two VDOT sources. There is an API for the tolling data, and I had to do some simple web-scraping to get the travel time data. This code can be found in the get_travel_times() and get_tolls() functions in the code.
Developing the voice interaction model took multiple iterations, and I found that as time went on, I was able to improve the dialog model while reducing the number of intents and number of slot types associated with each intent. However, even then, I found that the first released version of my skill didn’t work for users the way I had intended. For the most part is worked well technically (there was one bad bug), but users other than myself said things differently than I had thought they would, and asked for help differently. It definitely pays off to not just spend time thinking of how users will interact with your skill (as I did at first), but in having others test out your skill as well, and getting there feedback.
Because this was new to me, it took considerable time, as well as trial and error, to figure out how to write the handler code, and especially how to handle the session and persistent attributes and the interaction with DynamoDB. I used a large number of resources, with the best being the Skill SDK documentation, the Color Picker sample app, and A Beginner’s Guide to the New AWS Python SDK for Alexa, by Ralu Bolovan. As described in the documentation, the python SDK supports two coding models, one based on functions with decorators, and the other based on classes. I chose to use classes, but the Color Picker example uses decorated functions.
Some of the hassles I had came from two factors: 1) the interface to Alexa skills has changed over time. It’s been improving, but this also meant that some of the samples and tutorials on the web are out of date. 2) While there is thorough documentation, a lot of tutorials and examples focus on simple demonstrations. For this reason, it may have been better for to step back and read more of the SDK rather than always jumping in. For example, I needed to have my code do something every time an intent was called, regardless of what the intent was. It turns out this is handled by Request Interceptors and Response Interceptors, which most of the simple samples leave out. This, along with the thorough walk-through on using DynamoDB, is why I found the Beginner’s Guide to the New AWS Python SDK for Alexa to be so helpful.
I originally wanted the invocation for the skill to be “i sixty six tolls,”, but I found that Alexa had trouble recognizing this as the invocation. For this reason, I had to make the invocation “sixty six tolls” rather than “i. sixty six tolls.”
I also found that if you use Alexa’s built in “confirm” capability, then when your code is called for the first time, the handler_input.request_envelope.session.new is set to False, apparently because the built-in confirmation request kicked off the session. That’s something to be careful of. For this and other reasons, I ended up checking whether or not I had previously initialized the session attributes, rather than whether or not the session was new.
The last technical bug I fixed was that I hadn’t thought about what “local time” was to the server. I have been naively thinking that since I was using AWS’s Northern Virginia server, the local time would be the US eastern time zone, but all Lambda servers use GMT as their local time, which makes a lot more sense. So I used the pytz library to convert to local time.
For the voice interface, I found I had to expand the list of synonyms for slot values (such as the names used for exits), add more specific help queries, besides the comprehensive, and therefore long, “help” intent, and make use of the interface’s built-in capabilities for checking user-provided slot values, which I hadn’t read about in the simple tutorials.
I hope that this example will prove helpful for others who want to write their own custom Alexa skills.